Meltano UI and REST API Server (Deprecated)
This is an older, hidden page for Meltano UI. The UI is deprecated. Please see our troubleshooting page for more information.
Meltano is optimized for usage through the meltano CLI
and direct changes to the meltano.yml project file.
However, a web-based UI is also available for when you want to quickly check the status and most recent logs of your project's scheduled pipelines, or if you want to give less technical team members or clients the option to configure their extractors, loaders, and pipelines themselves.
Various settings are available that let you configure the Meltano UI server, enable and disable features, and customize its appearance.
Current status
Basic functionality around managing and configuring plugins and monitoring pipelines is available, as is an experimental Analysis feature, but many (newer) features of the CLI do not yet have a UI equivalent.
Missing functionality and other improvements are being tracked in the "Pipeline management and monitoring UI" epic, and new issues and contributions from the community are more than welcome, but the team is not currently prioritizing improvements to the UI because of the heavy focus on the CLI.
Usage during development
Start the Meltano UI web server using meltano ui:
meltano ui
Unless configured otherwise, the UI will now be available at http://localhost:5000.
Docker Compose
If you'd like to use Docker Compose to manage the Meltano UI application lifecycle,
you can add the appropriate docker-compose.yml file to your project by adding the
docker-compose file bundle:
# For these examples to work, ensure that
# Docker Compose has been installed
docker-compose --version

# Add Docker Compose files to your project
meltano add files files-docker-compose

# Start the `meltano-ui` service in the background
docker-compose up -d
Unless configured otherwise, the UI will now be available at http://localhost:5000.
For more details and instructions, refer to README contained in the file bundle.
Deployment in production
To learn about deploying Meltano UI in production, refer to the "Meltano UI" section of the Deployment in Production guide.
Screenshots
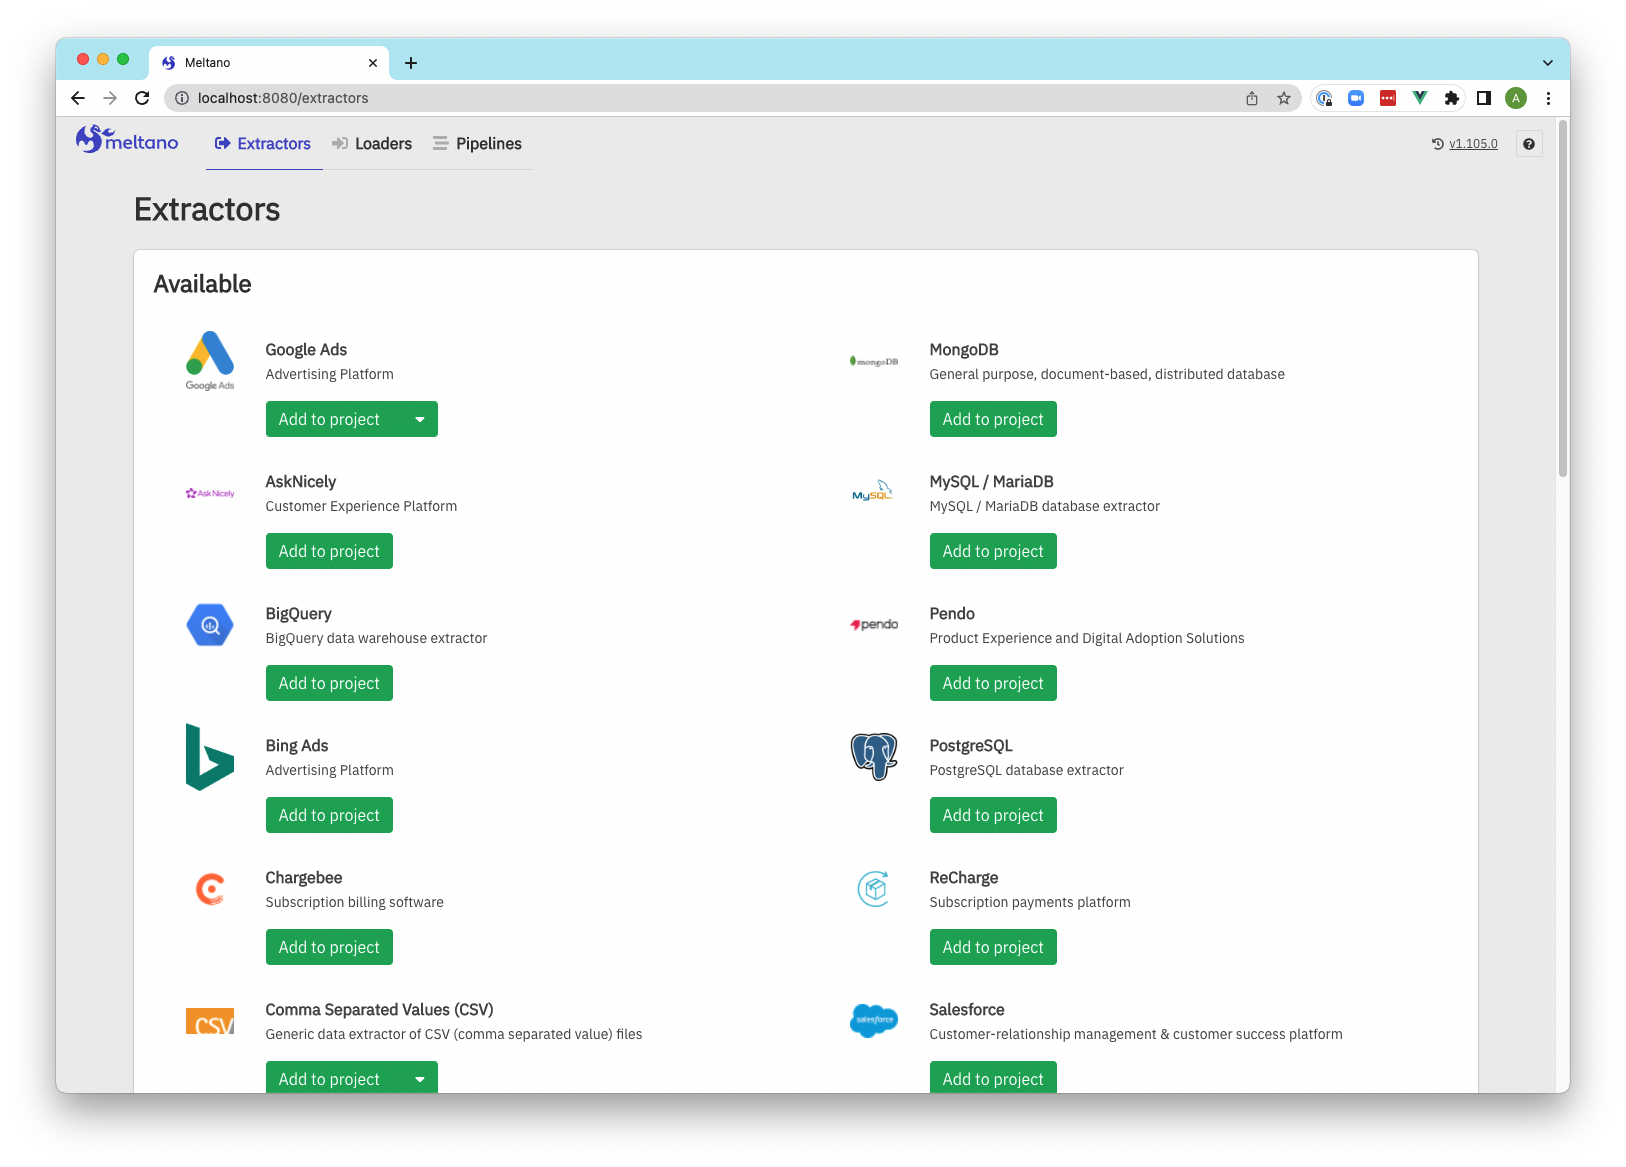
Extractors
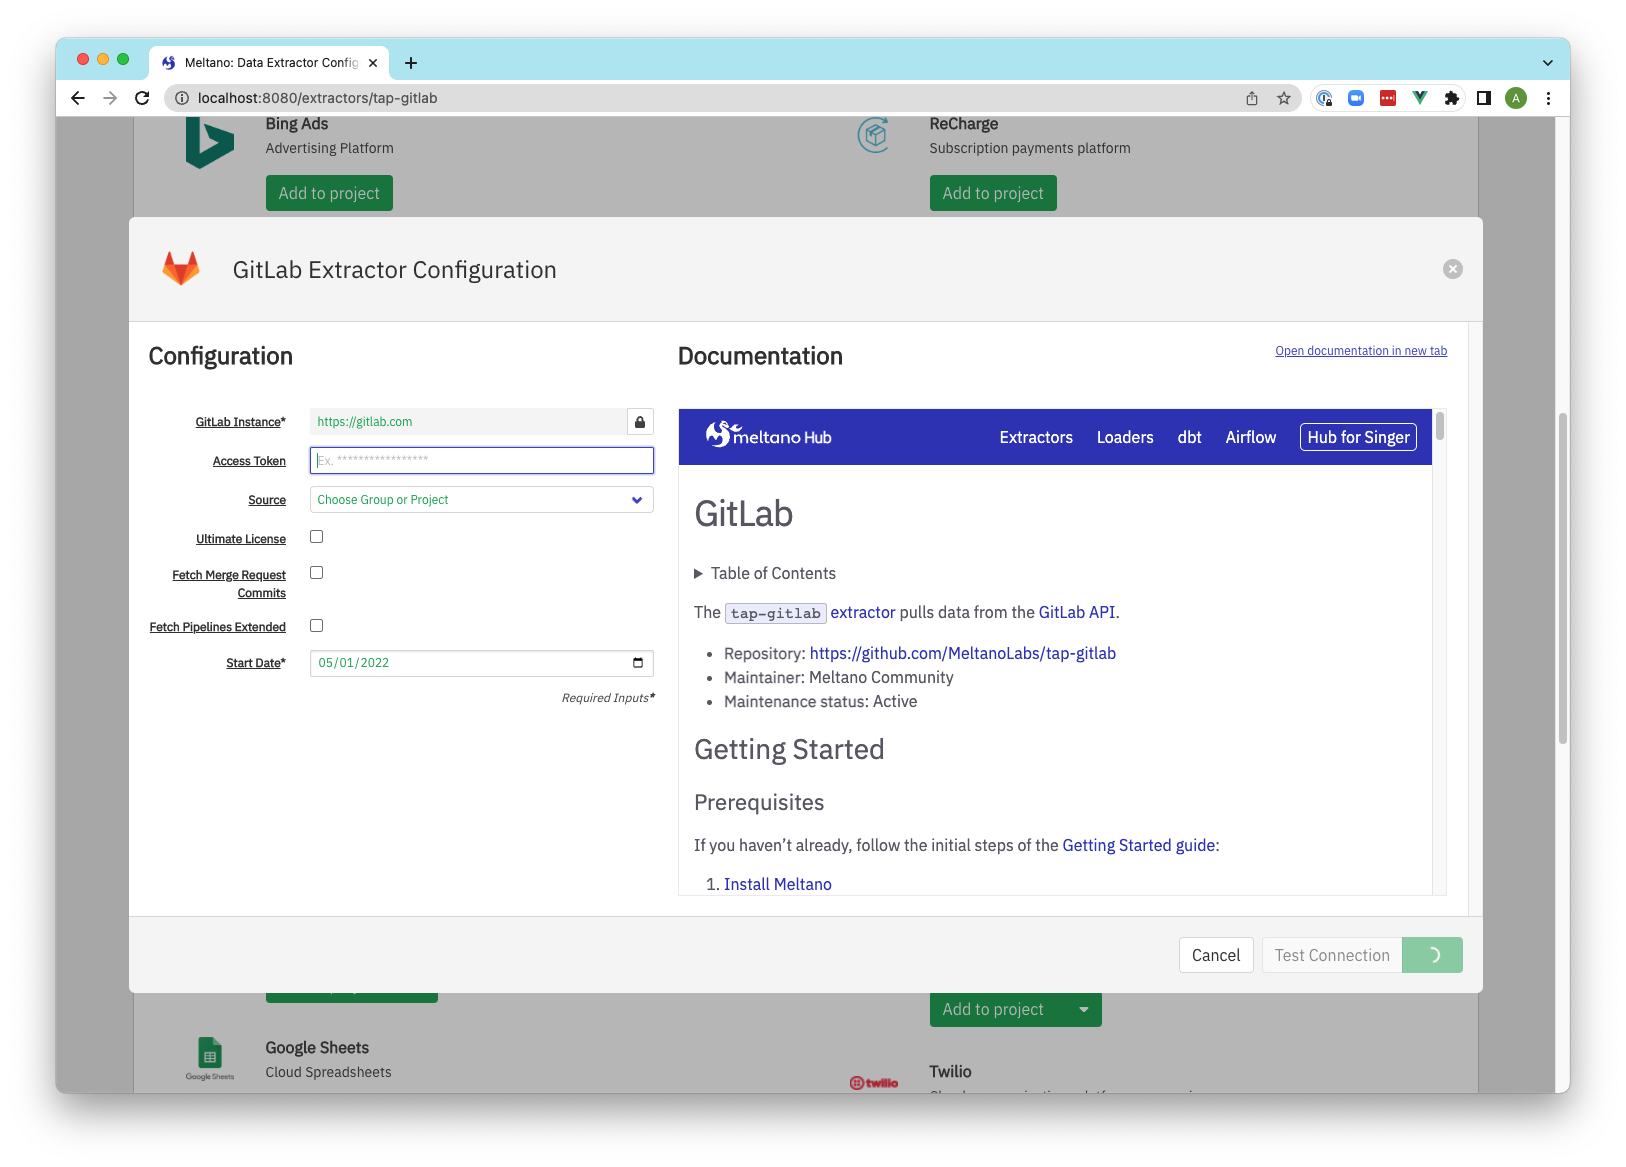
Extractor configuration
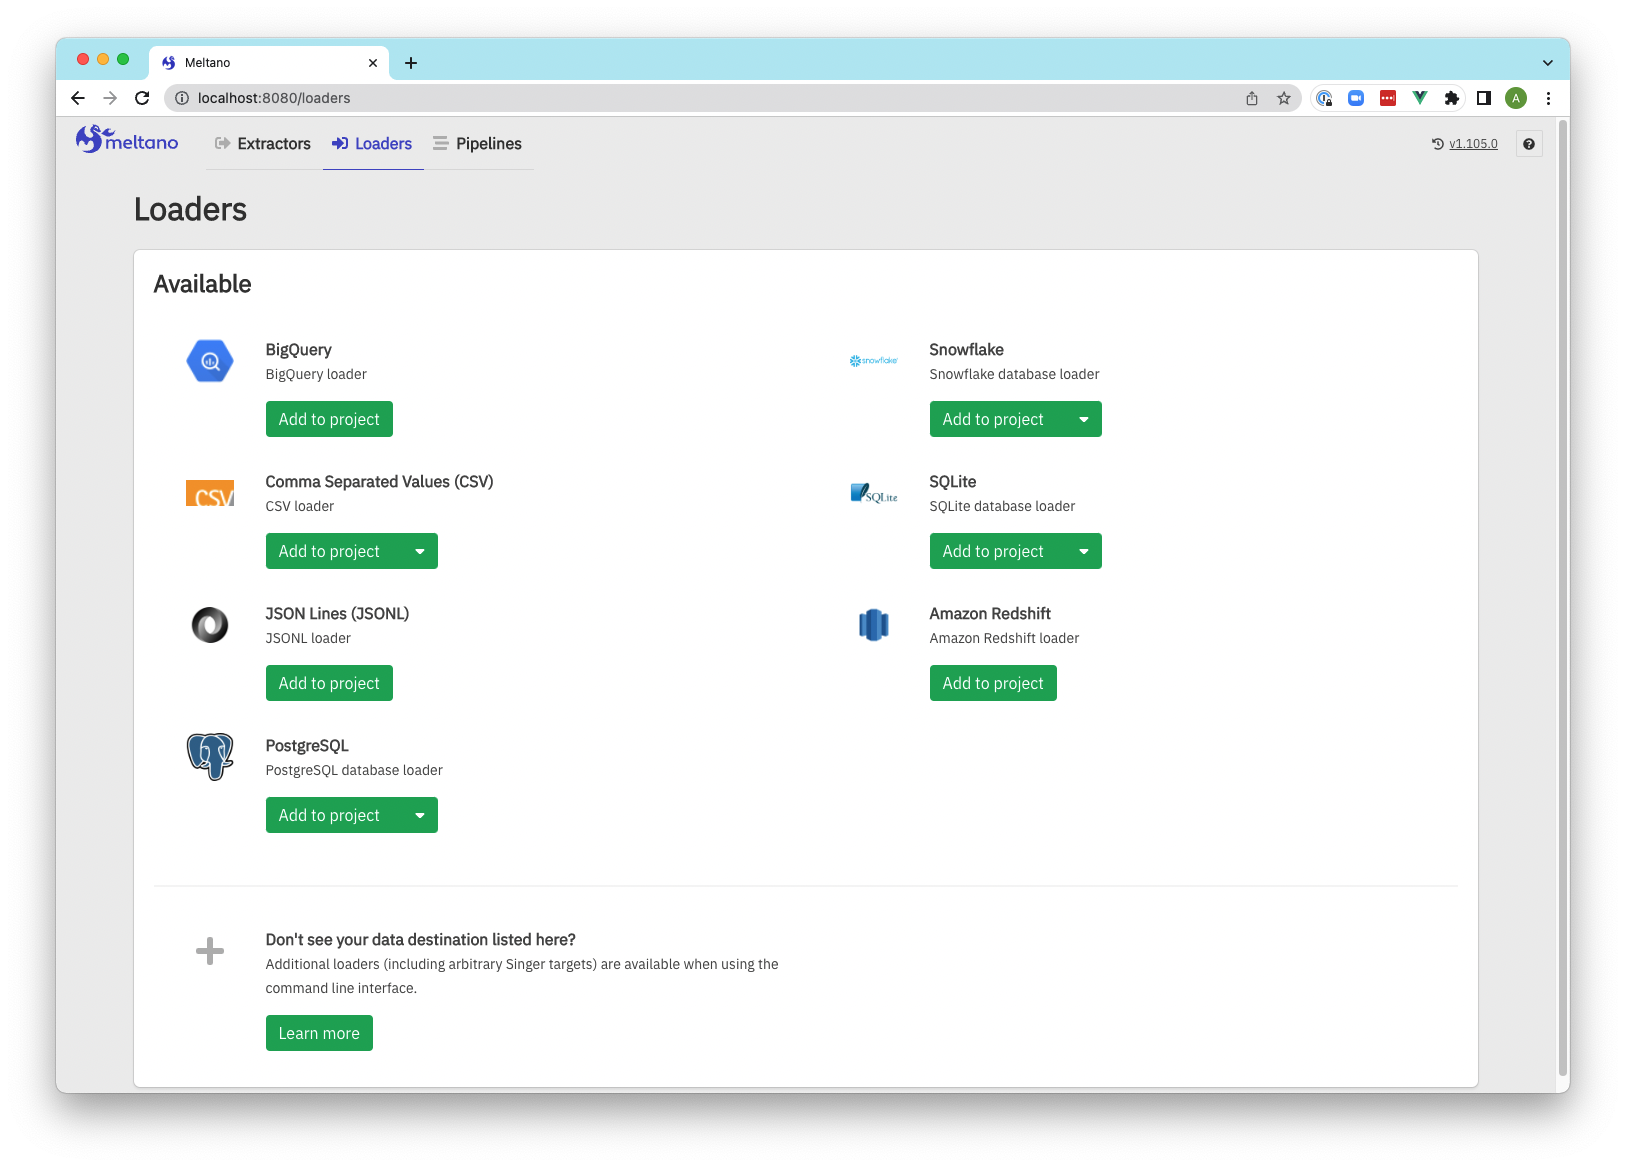
Loaders
Loaders configuration

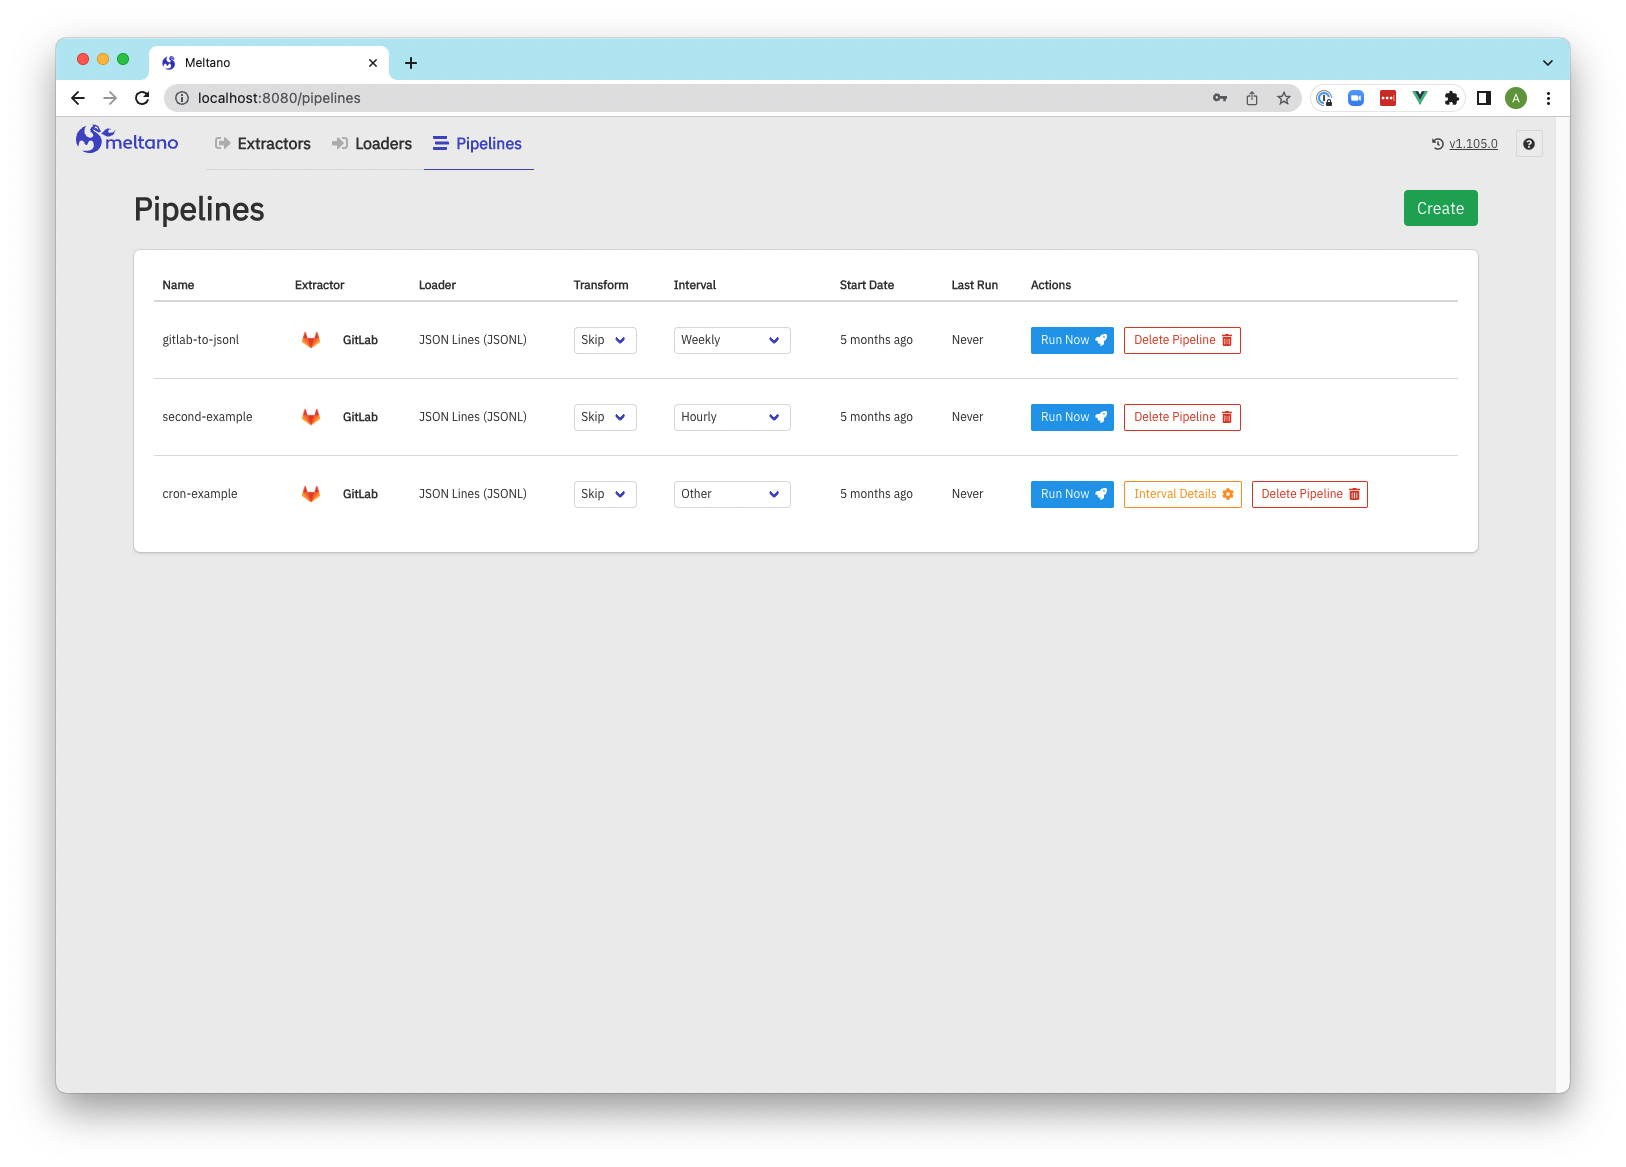
Pipelines
Pipeline creation

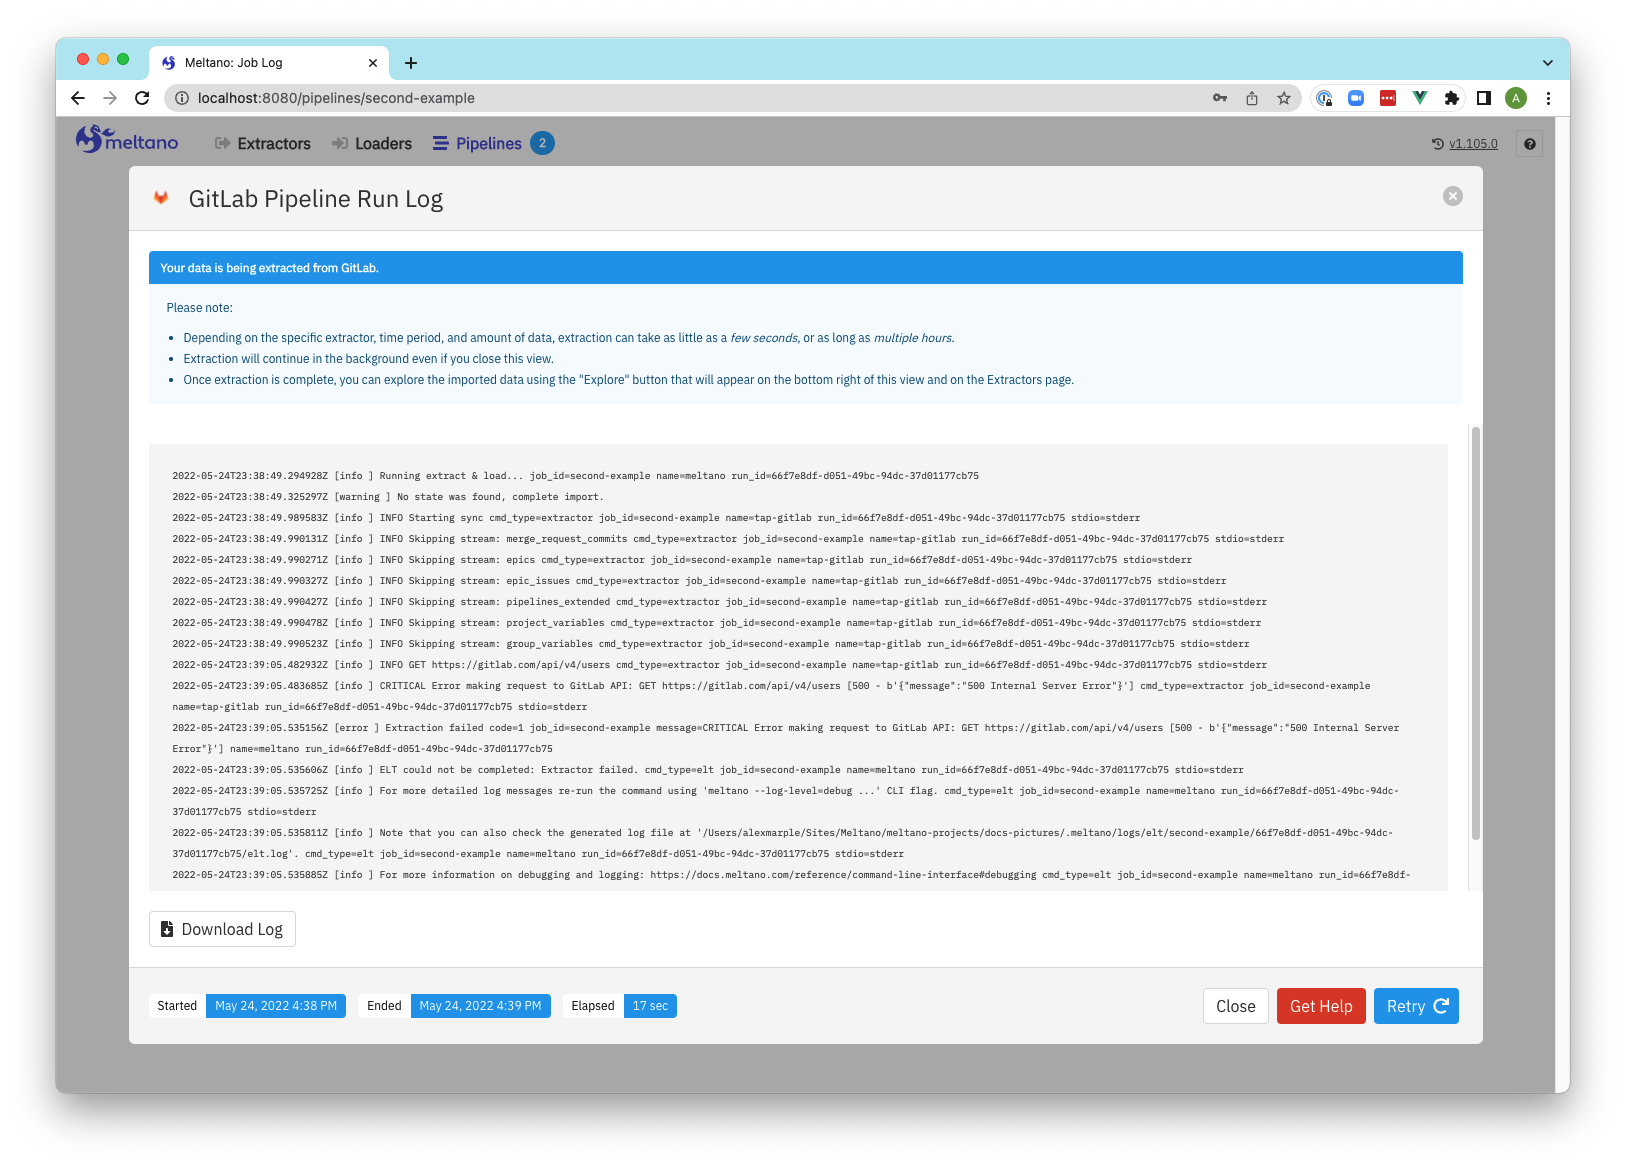
Pipeline run log
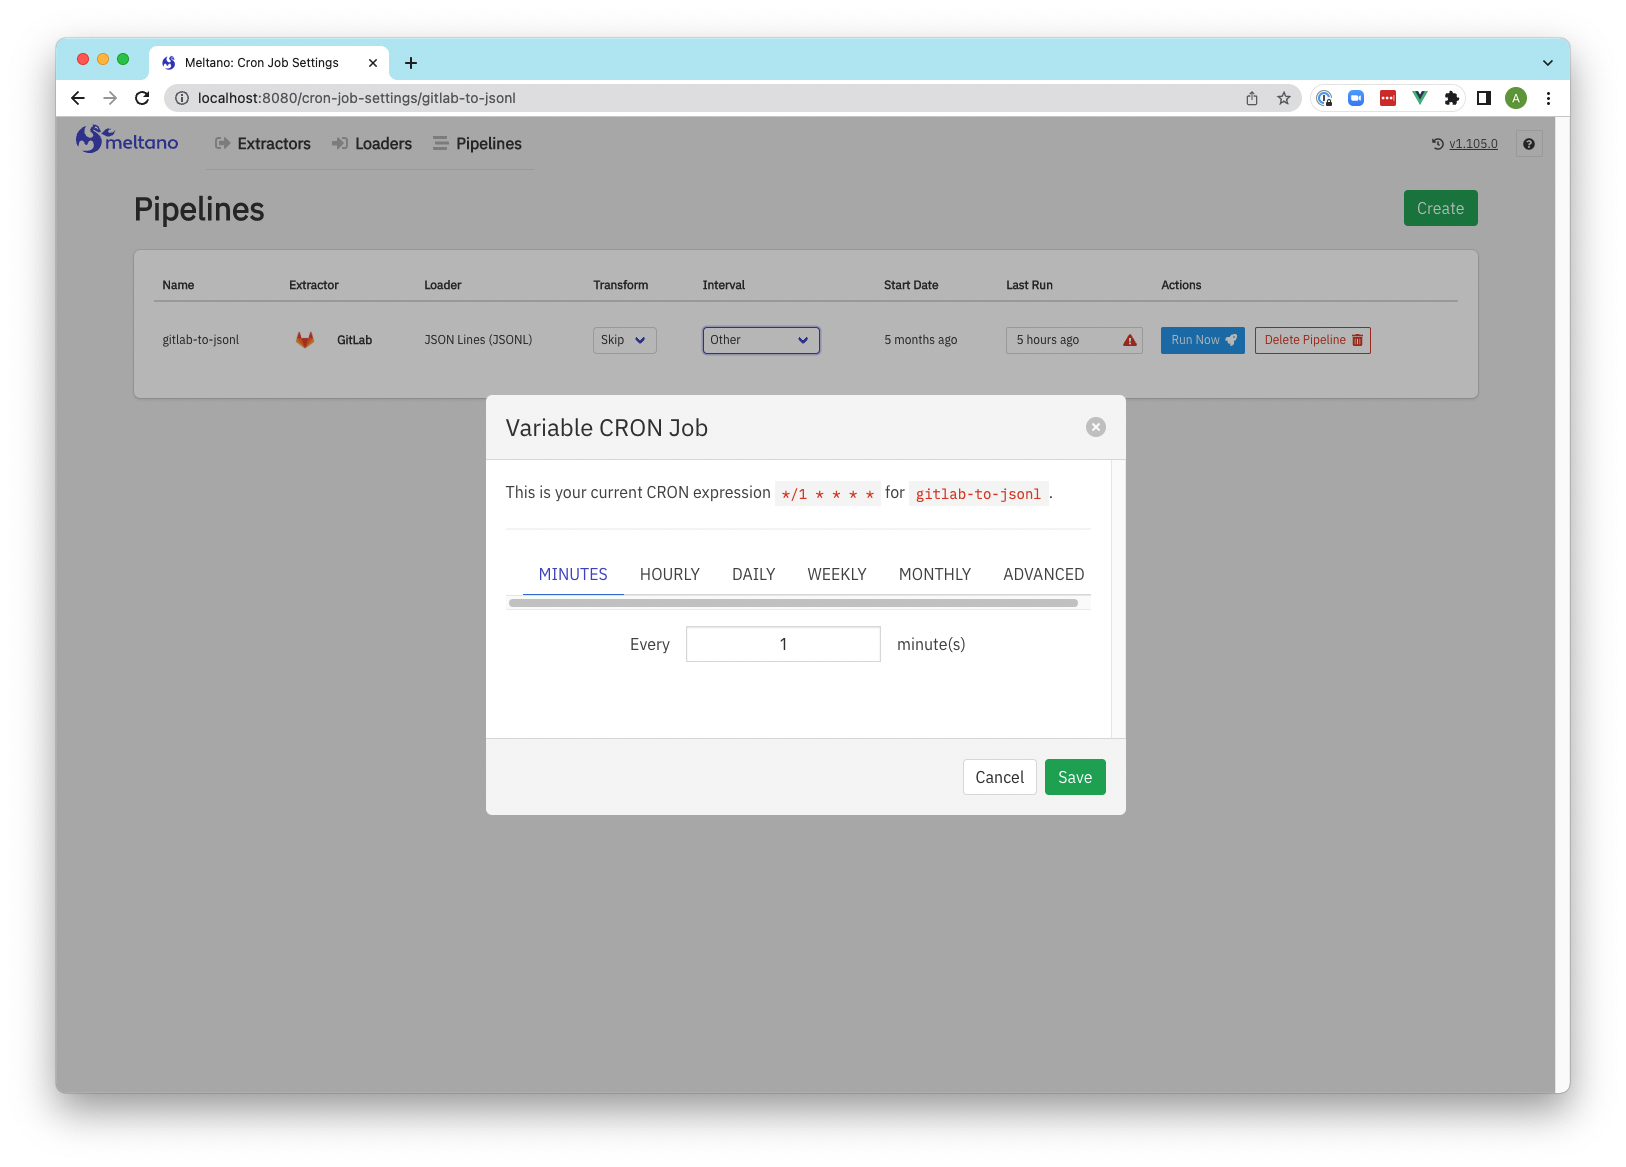
Pipeline update schedule to reflect CRON settings
Meltano UI server
These settings can be used to configure the Meltano UI server.
Meltano UI feature settings and customization settings have their own sections.
ui.bind_host
- Environment variable:
MELTANO_UI_BIND_HOST meltano uiCLI option:--bind- Default:
0.0.0.0
The host to bind to.
Together with the ui.bind_port setting, this setting corresponds to
Gunicorn's bind setting.
How to use
meltano config set meltano ui bind_host 127.0.0.1

export MELTANO_UI_BIND_HOST=127.0.0.1

meltano ui --bind=127.0.0.1
ui.bind_port
- Environment variable:
MELTANO_UI_BIND_PORT meltano uiCLI option:--bind-port- Default:
5000
The port to bind to.
Together with the ui.bind_host setting, this setting corresponds to
Gunicorn's bind setting.
How to use
meltano config set meltano ui bind_port 80

export MELTANO_UI_BIND_PORT=80

meltano ui --bind-port=80
ui.server_name
- Environment variable:
MELTANO_UI_SERVER_NAME - Default: None
The host and port Meltano UI is available at, e.g. <host>:<port>.
The port will usually match the ui.bind_port setting, and can be omitted when the default port for HTTP (80) or HTTPS (443) is used.
Unless the ui.session_cookie_domain setting is set, this setting will be used as the session cookie domain.
If the ui.notification setting is enabled, this setting will be used to generate external URLs in notification emails.
When set, Meltano UI will only respond to requests whose hostname (Host header) matches this setting.
If this is undesirable, you can set the ui.session_cookie_domain setting instead.
This may be the case when Meltano UI is situated behind a load balancer performing health checks without specifying a hostname.
If the ui.authentication setting is enabled,
meltano ui will print a
security warning if neither this setting or the ui.session_cookie_domain setting has been set.
This setting corresponds to Flask's SERVER_NAME setting.
How to use
meltano config set meltano ui server_name meltano.example.com

export MELTANO_UI_SERVER_NAME=meltano.example.com
meltano ui setup <server_name> can be
used to generate secrets for the ui.secret_key and
ui.password_salt settings, that will be stored in a
your project's .env file along with the specified server_name.
meltano ui setup meltano.example.com
ui.session_cookie_domain
- Environment variable:
MELTANO_UI_SESSION_COOKIE_DOMAIN - Default: None
The domain match rule that the session cookie will be valid for.
If not set, the cookie will be valid for all subdomains of the configured ui.server_name.
If the ui.authentication setting is enabled,
meltano ui will print a
security warning if neither this setting or the ui.server_name setting has been set.
This setting corresponds to Flask's SESSION_COOKIE_DOMAIN setting.
How to use
meltano config set meltano ui session_cookie_domain meltano.example.com

export MELTANO_UI_SESSION_COOKIE_DOMAIN=meltano.example.com
ui.session_cookie_secure
- Environment variable:
MELTANO_UI_SESSION_COOKIE_SECURE - Default:
false
Enable the Secure flag on the session cookie, so that the client will only send it to the server in HTTPS requests.
The application must be served over HTTPS for this to make sense.
This setting corresponds to Flask's SESSION_COOKIE_SECURE setting.
How to use
meltano config set meltano ui session_cookie_secure true

export MELTANO_UI_SESSION_COOKIE_SECURE=true
ui.secret_key
- Environment variable:
MELTANO_UI_SECRET_KEY - Default:
thisisnotapropersecretkey
A secret key that will be used for securely signing the session cookie.
If the ui.authentication setting is enabled,
meltano ui will print a
security warning if this setting has not been changed from the default.
This setting corresponds to Flask's SECRET_KEY setting.
How to use
meltano config set meltano ui secret_key <randomly-generated-secret>

export MELTANO_UI_SECRET_KEY=<randomly-generated-secret>
meltano ui setup <server_name> can be
used to generate secrets for the this setting and ui.password_salt,
that will be stored in your project's .env file
along with the specified ui.server_name.
meltano ui setup meltano.example.com
ui.password_salt
- Environment variable:
MELTANO_UI_PASSWORD_SALT - Default:
b4c124932584ad6e69f2774a0ae5c138
The HMAC salt to use when hashing passwords.
If the ui.authentication setting is enabled,
meltano ui will print a
security warning if this setting has not been changed from the default.
This setting corresponds to Flask-Security's SECURITY_PASSWORD_SALT setting.
How to use
meltano config set meltano ui password_salt <randomly-generated-secret>

export MELTANO_UI_PASSWORD_SALT=<randomly-generated-secret>
meltano ui setup <server_name> can be
used to generate secrets for the this setting and ui.secret_key,
that will be stored in your project's .env file
along with the specified ui.server_name.
meltano ui setup meltano.example.com
ui.workers
- Environment variable:
MELTANO_UI_WORKERS - Default:
4
The number of worker processes meltano ui will use to handle requests.
This setting corresponds to Gunicorn's workers setting.
How to use
meltano config set meltano ui workers 1

export MELTANO_UI_WORKERS=1
ui.forwarded_allow_ips
- Environment variable:
MELTANO_UI_FORWARDED_ALLOW_IPS - Default:
127.0.0.1
Comma-separated front-end (reverse) proxy IPs that are allowed to set secure headers to indicate HTTPS requests.
Set to * to disable checking of front-end IPs, which can be useful for setups where you don't know in advance the IP address of front-end, but you still trust the environment.
This setting corresponds to Gunicorn's forwarded_allow_ips setting.
How to use
meltano config set meltano ui forwarded_allow_ips "*"

export MELTANO_UI_FORWARDED_ALLOW_IPS="*"
Meltano UI features
These settings can be used to enable certain features of Meltano UI.
Meltano UI server settings and customization settings have their own sectionss
ui.readonly
- Environment variable:
MELTANO_UI_READONLY - Default:
false
To block all write actions in the Meltano UI, you can run it in in read-only mode.
If you're enabling the ui.authentication setting and would
like to only use read-only mode for anonymous users, enable the ui.anonymous_readonly setting instead.
This setting differs from the project_readonly setting in two ways:
- it also blocks write actions in the UI that do not modify project files, like storing settings in the system database, and
- it does not affect the CLI.
How to use
meltano config set meltano ui readonly true

export MELTANO_UI_READONLY=true
ui.authentication
- Environment variable:
MELTANO_UI_AUTHENTICATION - Default:
false
Use this setting to enable authentication and disallow anonymous usage of your Meltano instance.
Additionally, you will need to:
-
Ensure your configuration is secure by setting the
ui.secret_keyandui.password_saltsettings, as well asui.server_nameorui.session_cookie_domain, manually or usingmeltano ui setup <server_name>. -
Create at least one user using
meltano user add.
How to use
meltano config set meltano ui authentication true

export MELTANO_UI_AUTHENTICATION=true
ui.anonymous_readonly
- Environment variable:
MELTANO_UI_ANONYMOUS_READONLY - Default:
false
When the ui.authentication setting is enabled,
enabling this setting will allow anonymous users read-only access to Meltano UI.
Once a user is authenticated, write actions will be available again.
This setting is especially useful when setting up a publicly available demo instance of Meltano UI for anonymous users to interact with. These users will not be able to make any changes, but admins will once they sign in.
How to use
meltano config set meltano ui anonymous_readonly true

export MELTANO_UI_ANONYMOUS_READONLY=true
ui.notification
- Environment variable:
MELTANO_UI_NOTIFICATION - Default:
false
Meltano can send email notifications upon certain events.
Your outgoing mail server can be configured using the mail.* settings below.
To ease the development and testing, Meltano is preconfigured to use a local MailHog instance to trap all the outgoing emails.
Use the following docker command to start it:
docker run --rm -p 1025:1025 -p 8025:8025 --name mailhog mailhog/mailhog
All emails sent by Meltano should now be available at http://localhost:8025/
How to use
meltano config set meltano ui notification true

export MELTANO_UI_NOTIFICATION=true
Meltano UI customization
These settings can be used to customize certain aspects of Meltano UI.
Meltano UI server settings and feature settings have their own sections.
ui.logo_url
- Environment variable:
MELTANO_UI_LOGO_URL - Default: None
Customize the logo used by Meltano UI in the navigation bar and on the sign-in page (when the ui.authentication setting is enabled).
How to use
meltano config set meltano ui logo_url https://meltano.com/meltano-logo-with-text.svg

export MELTANO_UI_LOGO_URL=https://meltano.com/meltano-logo-with-text.svg
Mail server
Meltano uses Flask-Mail to send emails. Take a look at the documentation to properly configure your outgoing email server.
mail.server
- Environment variable:
MELTANO_MAIL_SERVER - Default:
localhost
meltano config set meltano mail server smtp.example.com
export MELTANO_MAIL_SERVER=smtp.example.com
mail.port
- Environment variable:
MELTANO_MAIL_PORT - Default:
1025
meltano config set meltano mail port 25
export MELTANO_MAIL_PORT=25
mail.default_sender
- Environment variable:
MELTANO_MAIL_DEFAULT_SENDER - Default:
"Meltano" <bot@meltano.com>
meltano config set meltano mail default_sender '"Example Meltano" <bot@meltano.example.com>'
export MELTANO_MAIL_DEFAULT_SENDER='"Example Meltano" <bot@meltano.example.com>'
mail.use_tls
- Environment variable:
MELTANO_MAIL_USE_TLS - Default:
false
meltano config set meltano mail use_tls true
export MELTANO_MAIL_USE_TLS=true
mail.username
- Environment variable:
MELTANO_MAIL_USERNAME - Default: None
meltano config set meltano mail username meltano
export MELTANO_MAIL_USERNAME=meltano
mail.password
- Environment variable:
MELTANO_MAIL_PASSWORD - Default: None
meltano config set meltano mail password meltano
export MELTANO_MAIL_PASSWORD=meltano
mail.debug
- Environment variable:
MELTANO_MAIL_DEBUG - Default:
false
meltano config set meltano mail debug true
export MELTANO_MAIL_DEBUG=true
mail.sendgrid_unsubscribe_group_id
If you are using the SendGrid SMTP API you may optionally set the SendGrid unsubscribe group ID.
- Environment variable:
MELTANO_MAIL_SENDGRID_UNSUBSCRIBE_GROUP_ID - Default:
12751
meltano config set meltano mail sendgrid_unsubscribe_group_id 42
export MELTANO_MAIL_SENDGRID_UNSUBSCRIBE_GROUP_ID=42
OAuth Service
Meltano ships with an OAuth Service to handle the OAuth flow in the Extractors' configuration.
To run this service, you must have a registered OAuth application on the Authorization server.
Most importantly, the Redirect URI must be set properly so that the OAuth flow can be completed.
This process is specific to each Provider.
The OAuth Service is bundled within Meltano, and is automatically started with meltano ui and mounted at /-/oauth for development purposes.
As it is a Flask application, it can also be run as a standalone using:
FLASK_ENV=production FLASK_APP=meltano.oauth python -m flask run --port 9999
oauth_service.url
- Environment variable:
MELTANO_OAUTH_SERVICE_URL - Default: None
The local OAuth service for development purposes is available at /-/oauth.
How to use
meltano config set meltano oauth_service url https://oauth.svc.meltanodata.com
export MELTANO_OAUTH_SERVICE_URL=https://oauth.svc.meltanodata.com
oauth_service.providers
- Environment variable:
MELTANO_OAUTH_SERVICE_PROVIDERS - Default:
all
To enable specific providers, use comma-separated oauth.provider names from discovery.yml. To enable all providers, use all.
How to use
meltano config set meltano oauth_service providers facebook,google_adwords
export MELTANO_OAUTH_SERVICE_PROVIDERS=facebook,google_adwords
oauth_service.facebook.client_id
- Environment variable:
OAUTH_FACEBOOK_CLIENT_ID - Default: None
meltano config set meltano oauth_service facebook client_id <facebook-client-id>
export OAUTH_FACEBOOK_CLIENT_ID=<facebook-client-id>
oauth_service.facebook.client_secret
- Environment variable:
OAUTH_FACEBOOK_CLIENT_SECRET - Default: None
meltano config set meltano oauth_service facebook client_secret <facebook-client-secret>
export OAUTH_FACEBOOK_CLIENT_SECRET=<facebook-client-secret>
oauth_service.google_adwords.client_id
- Environment variable:
OAUTH_GOOGLE_ADWORDS_CLIENT_ID - Default: None
meltano config set meltano oauth_service google_adwords client_id <google-adwords-client-id>
export OAUTH_GOOGLE_ADWORDS_CLIENT_ID=<google-adwords-client-id>
oauth_service.google_adwords.client_secret
- Environment variable:
OAUTH_GOOGLE_ADWORDS_CLIENT_SECRET - Default: None
meltano config set meltano oauth_service google_adwords client_secret <google-adwords-client-secret>
export OAUTH_GOOGLE_ADWORDS_CLIENT_SECRET=<google-adwords-client-secret>
OAuth Single-Sign-On
These variables are specific to Flask-OAuthlib and work with OAuth authentication with GitLab.
These settings are used for single-sign-on using an external OAuth provider.
For more information on how to get these from your GitLab application, check out the integration docs from GitLab.
oauth.gitlab.client_id
- Environment variable:
OAUTH_GITLAB_CLIENT_ID, alias:OAUTH_GITLAB_APPLICATION_ID - Default: None
meltano config set meltano oauth gitlab client_id <gitlab-client-id>
export OAUTH_GITLAB_CLIENT_ID=<gitlab-client-id>
export OAUTH_GITLAB_APPLICATION_ID=<gitlab-client-id>
oauth.gitlab.client_secret
- Environment variable:
OAUTH_GITLAB_CLIENT_SECRET, alias:OAUTH_GITLAB_SECRET - Default: None
meltano config set meltano oauth gitlab client_secret <gitlab-client-secret>
export OAUTH_GITLAB_CLIENT_SECRET=<gitlab-client-secret>
export OAUTH_GITLAB_SECRET=<gitlab-client-secret>
CLI
ui
meltano ui: Start the Meltano UI.
start (default)
Start the Meltano UI.
setup
This command is only relevant for production-grade setup.
Generate secrets for the ui.secret_key
and ui.password_salt settings, that
will be stored in your project's .env file along with the
specified value for the ui.server_name setting.
In production, you will likely want to move these settings to actual environment variables, since .env is in .gitignore by default.
Regenerating secrets will cause the following:
- All passwords will be invalid
- All sessions will be expired
Use with caution!
How to use
The --bits flag can be used to specify the size of the secrets, default to 256.
# Format
meltano ui setup [--bits=256] <server_name>

meltano ui setup meltano.example.com
Using ui with Environments
The ui command does not run relative to a Meltano Environment. The --environment flag and default_environment setting in your meltano.yml file will be ignored if set.
Contributing Docs
UI Development
In the event you are contributing to Meltano UI and want to work with all of the frontend tooling (i.e., hot module reloading, etc.), you will need to run the following commands:
# Activate your poetry created virtual environment if needed.
# If you manage your virtualenv activation through other means you can omit this command.
poetry shell
# Create a new Meltano project
meltano init $PROJECT_DIRECTORY
# Change directory into your newly created project
cd $PROJECT_DIRECTORY
# Start the Meltano API and a production build of Meltano UI that you can ignore
meltano ui
# Open a new terminal tab and go to the directory you cloned meltano into
cd $WHEREVER_YOU_CLONED_MELTANO/src/webapp
# Install frontend infrastructure at the root directory
yarn
# Start local development environment
yarn serve
The development build of the Meltano UI will now be available at http://localhost:8080/.
A production build of the API will be available at http://localhost:5000/ to support the UI, but you will not need to interact with this directly. However, as mentioned in the API Development section above, users on MacOS may need to specify an alternate bind to port to prevent a port conflict with a MacOS system service also running on port 5000.
If you're developing for the Embed app (embeddable iframe for reports) you can toggle MELTANO_EMBED:
# Develop for the embed app
export MELTANO_EMBED=1

# Develop for the main app (this is the default)
export MELTANO_EMBED=0

# Start local development environment
yarn serve
If you need to change the URL of your development environment, you can do this by updating your project's .env file with the following configuration:
# The URL where the web app will be located when working locally in development
# since it provides the redirect after authentication.
# Not require for production
export MELTANO_UI_URL = ""
UI/UX
Visual Hierarchy
Depth
The below level hierarchy defines the back to front depth sorting of UI elements. Use it as a mental model to inform your UI decisions.
- Level 1 - Primary navigation, sub-navigation, and signage - Grey
- Level 2 - Primary task container(s) - White w/Shadow
- Level 3 - Dropdowns, dialogs, pop-overs, etc. - White w/Shadow
- Level 4 - Modals - White w/Lightbox
- Level 5 - Toasts - White w/Shadow + Message Color
Interactivity
Within each aforementioned depth level is an interactive color hierarchy that further organizes content while communicating an order of importance for interactive elements. This interactive color hierarchy subtly influences the user's attention and nudges their focus.
- Primary -
$interactive-primary- Core interactive elements (typically buttons) for achieving the primary task(s) in the UI
- Fill - Most important
- Stroke - Important
- Secondary -
$interactive-secondary- Supporting interactive elements (various controls) that assist the primary task(s) in the UI
- Fill - Most important
- Can be used for selected state (typically delegated to stroke) for grouped buttons (examples usage seen in Transform defaults)
- Stroke - Important
- Denotes the states of selected, active, and/or valid where grey represents the opposites unselected, inactive, and/or invalid
- Tertiary - Greyscale
- Typically white buttons and other useful controls that aren't core or are in support of the primary task(s) in the UI
- Navigation -
$interactive-navigation- Denotes navigation and sub-navigation interactive elements as distinct from primary and secondary task colors
After the primary, secondary, tertiary, or navigation decision is made, the button size decision is informed by:
- Use the default button size
- Use the
is-smallmodifier if it is within a component that can have multiple instances
Markup Hierarchy
There are three fundamental markup groups in the codebase. All three are technically VueJS single-file components but each have an intended use:
- Views (top-level "pages" and "page containers" that map to parent routes)
- Sub-views (nested "pages" of "page containers" that map to child routes)
- Components (widgets that are potentially reusable across parent and child routes)
Here is a technical breakdown:
- Views - navigation, signage, and sub-navigation
- Navigation and breadcrumbs are adjacent to the main view
- Use
<router-view-layout>as root with only one child for the main view:<div class="container view-body">- Can expand based on task real-estate requirements via
is-fluidclass addition
- Can expand based on task real-estate requirements via
- Reside in the
src/viewsdirectory
- Sub-views - tasks
- Use
<section>as root (naturally assumes a parent of<div class="container view-body">) with one type of child:- One or more
<div class="columns">each with their needed<div class="column">variations
- One or more
- Reside in feature directory (ex.
src/components/analyze/AnalyzeModels)
- Use
- Components - task helpers
- Use Vue component best practices
- Reside in feature or generic directory (ex.
src/components/analyze/ResultTableandsrc/components/generic/Dropdown)